Navigating the Labyrinth: My Journey Through Black Myth: Wukong's Chapter 2
Master the sprawling, non-linear labyrinth of Black Myth: Wukong's Yellow Wind Ridge with this essential guide. Uncover hidden paths, defeat formidable bosses, and unlock secret treasures to conquer this desert's whispering chaos.
I stand at the threshold of the Yellow Wind Ridge, the desert sands whispering tales of forgotten gods and hidden paths. The air itself feels like a palimpsest of forgotten journeys, where every gust of wind has erased and rewritten the stories of those who came before. Chapter 2 of Black Myth: Wukong unfolds not as a road, but as a living, breathing labyrinth. It is a cartographer's nightmare and an explorer's dream, a sprawling, non-linear tapestry where every canyon wall holds a secret and every shadowed path forks into three more. To venture here without a guide is to become another grain of sand lost to the eternal, whispering gales. My journey through this chaos was one of discovery, frustration, and ultimately, mastery, guided by the wisdom of those who had charted these sands before me.
My pilgrimage began, as many do, in the crumbling embrace of Sandgate Village. This settlement was a microcosm of the entire chapter, a puzzle box of blocked arches and serpentine shortcuts that taught me the language of this land. Here, I found:
-
Three enigmatic NPCs, their dialogues cryptic threads in a larger tapestry.
-
Two Spirits, ethereal guides in the physical world.
-
Two inaugural bosses: the King Of Flowing Sands and the Second Prince. Their defeat was a key that unlocked the ridge beyond, though the central gate remained stubbornly sealed, forcing a choice upon me.
From Sandgate, the world split like a forked tongue. The order was mine to decide.
🔥 The Left Path: Caves and Temples
Choosing the leftward trail led me into a cavern's maw, where the First Prince awaited. This battle arena held a secret more valuable than the victory itself: a man-made wall. With a mighty blow from the Wandering Wight Spirit, I shattered it, revealing the precious Loong Scales. This item felt less like a key and more like a skeleton key forged from moonlight, its purpose to unlock the slumbering Loong bosses hidden throughout the game's world. Beyond the cave lay the solemn, oppressive Crouching Tiger Temple, domain of the formidable Tiger Vanguard.
Defeating this guardian was not the end. Behind his arena lay the entrance to the Yellow Wind Formation, and within the temple itself, a secret waited. Only by also besting the Stone Vanguard (found later) could I interact with a Tally to unlock the Temple Cellar—a direct, shadowy shortcut to the chapter's final confrontation.
The Yellow Wind Formation itself was a brief respite of relative linearity. This path was a treasure trail, holding:
-
A Sobering Stone (vital for the Drunken Boar's tale).
-
A Luojia Fragrant Vine.
-
The Old Rattle-Drum, claimed from the Tiger's Acolyte on a windswept bridge near Windrest Hamlet.
❄️ The Right Path: Cliffs and Quests
Crossing the bridge from Sandgate Village plunged me into the vertiginous realms of Fright Cliff. Here, the chapter's soul truly resided, not in singular battles, but in intertwined stories. This region was a triptych of fate, housing three major questlines:
| Questline | Starting Point | Key Rewards & Encounters |
|---|---|---|
| The Drunken Boar | Rockrest Flat | Access to the secret Kingdom Of Sahālī |
| The Man-In-Stone | Various locations | Two boss fights, a new vendor |
| Buddha's Eyeballs | Scattered collectibles | Summons the Shigandang boss |
Among these tales lurked the region's most fearsome challenge: the Black Loong. Using the Loong Scales from the left-hand cave, I passed behind a "sand waterfall" in Rockrest Flat to awaken this magnificent, terrifying beast—a secret boss for the diligent explorer.
Both the Formation and the Cliff ultimately converged, like tributaries to a violent sea, at the arena of the Stone Vanguard and Shigandang. Reaching this point from either direction felt like the culmination of a long, winding prayer.
✨ The Hidden Kingdom
Before facing the chapter's ultimate end in the Temple Cellar, one last secret realm beckoned. By completing the Drunken Boar's quest, I earned passage past the Yellow-Robed Squire and through a once-sealed door in Rockrest Flat. This revealed the Kingdom Of Sahālī, Chapter 2's hidden expanse. Here, amidst the endless dunes, I battled a second "Tiger Vanguard" and the mighty Fuban, and found a solitary, precious Meditation Spot in the Sandgate Bound area—a moment of peace in a land of turmoil.
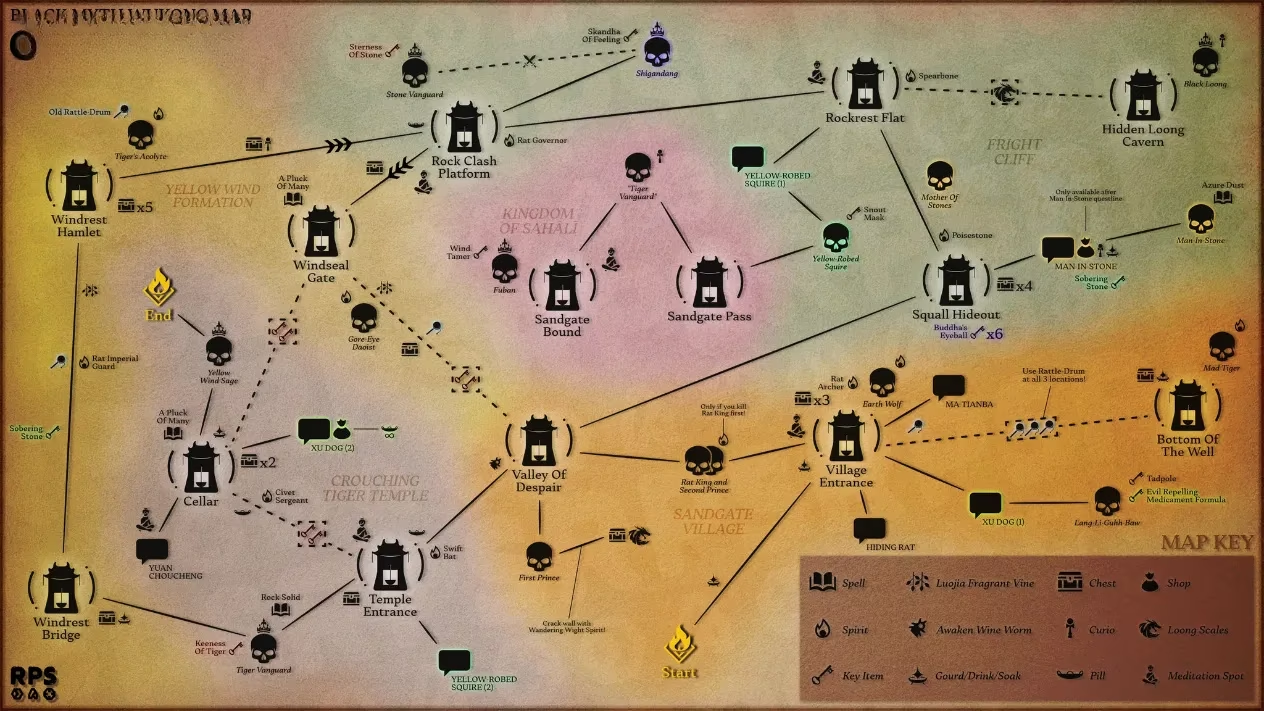
🗺️ Charting the Chaos: The In-Game Map
No pilgrim should venture into these sands unprepared. While external guides provide wisdom, the game itself offers a tool. Unlike Chapter 1's gift, the Chapter 2 map, the "Wind-Eroded Ridge" Journeyer's Chart, must be earned. The process is simple:
-
Rest at any Keeper's Shrine.
-
Select "Store" from the menu.
-
Scroll and purchase the chart for 600 Will.
Once obtained, a press of the View button (Xbox) or touchpad (PS5) unfolds this invaluable chart, transforming the overwhelming desert into a navigable, if still mysterious, landscape. It marks the crucial points: Shrines, bosses, Meditation Points, and collectibles like the elusive Awaken Wine Worms.
My journey through the Yellow Wind Ridge was more than a series of battles; it was an act of cartography of the soul. I learned that its chaos was not absence of design, but a deeper, more demanding order. The paths I walked, the secrets I unearthed, and the bosses I felled are now etched not just on a map, but in the memory of this Staff. For those who follow, may your will be as strong as the eternal wind, and your path as clear as the stars over the desert. The labyrinth awaits.