Black Myth Wukong's Yellow Wind Sage: A Comprehensive Boss Breakdown for 2026
Conquer the formidable Yellow Wind Sage in Black Myth Wukong with expert strategies and the essential Wind Tamer Vessel for victory.
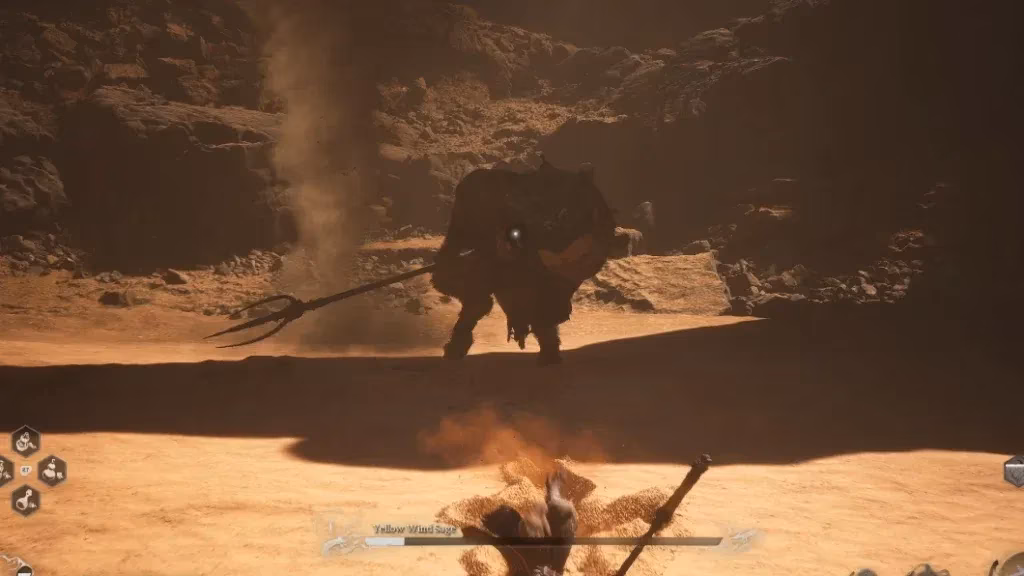
The Yellow Wind Sage stands as the formidable final trial of Black Myth Wukong's second chapter, a powerful adversary who commands the very winds of Sahali. This boss battle is a multi-stage test of skill, aggression, and preparation, growing increasingly perilous as his health diminishes. His mastery over wind not only enhances his offensive capabilities but also reveals a critical weakness: the Wind Tamer Vessel. Securing this key item from the Yellow-Robed Squire's questline by defeating Fuban is highly recommended, as it provides a crucial window to stagger the Sage and dispel his debilitating sandstorms, dramatically simplifying the encounter, especially in its later, more frantic stages.

Key Preparation 🛡️:
-
Essential Item: Wind Tamer Vessel (from Yellow-Robed Squire/Fuban quest).
-
Weapon Upgrades: Consider defeating optional bosses like Black Loong or Shigandang for a superior Staff.
-
Combat Stance: Utilize the Thrust Stance for increased range to more consistently land interrupting Heavy Attacks.
The Yellow Wind Sage is a highly mobile foe who excels at chaining aggressive attack sequences. A passive, defensive approach often leads to failure. The optimal strategy is to maintain relentless pressure by staying close, deftly dodging (left, right, or forward) through his combos, and punishing his recovery animations. Conserving resources like Mana for the later, more dangerous phases is a wise tactical choice.
Phase 1: The Opening Salvo 🎯
In his initial form, the Sage employs a core set of moves:
-
Spear Combo: A series of sweeping strikes culminating in a ground slam that erupts with sand blades. Dodge to the side or through the boss; the final slam has a long recovery, offering a prime damage window.
-
Melee Assaults: A mix of jumping attacks, slashes, and stomps. Staying close and dodging laterally is key. Crucial Tell: Any glow on his weapon or body signals a follow-up shockwave or impaling sand blades.
-
Ranged Threat: If allowed distance, he augments his attacks with wind blades, significantly increasing their difficulty to evade.
Phase 2: The Sandstorm Mirage (~66% Health) 🌪️
Upon reaching two-thirds health, the battle undergoes its first major shift. The Sage spins his weapon, summoning a sandstorm before fading into it and conjuring attacking mirages.
Mirage Sequence:
-
The first mirage creates a line of spears before attacking directly. Focus solely on dodging; it cannot be killed.
-
The second mirage leaps, strikes the ground, retreats, and strikes again. Dodge both impacts.
After the mirages, the boss reappears with enhanced aggression, sometimes using the leaping strike pattern himself. He may also occasionally jump outside the arena. Players can either wait or use the Wind Tamer Vessel to dispel the storm and force his return, though this consumes the item for the final phase.
⚠️ Critical Alert: The Grab Attack
A new and highly dangerous move appears: a devastating grab. The tell is a distinct, lowered crouching stance before he kicks the Destined One into the air for a spear impalement and stomp. Keeping the Health Gourd topped up is essential to survive a potential hit.

Phase 3: The Tornado's Fury (~33-25% Health) 💀
The climax of the fight begins as the Sage channels wind to summon a wandering tornado, drastically increasing the arena's danger.
Survival & Strategy for Phase 3:
-
Optimal Use of Vessel: This is the perfect moment to use the Wind Tamer Vessel to stun the boss and clear the sandstorm, creating a safe damage window.
-
Maximize Burst Damage: The goal is to end this phase swiftly. Unleash stored resources:
-
Cast Pluck of Many followed by a charged Heavy Attack to maximize clone damage.
-
Activate a Transformation like Red Tides for mobility and protection or Azure Dust to absorb heavy hits.
-
-
Positional Awareness: NEVER fight near the tornado. Being knocked into it can lead to an inescapable combo and instant death.
-
Rare Mirage Summon: He may rarely summon mirages during this phase. Using the Wind Tamer Vessel to counter him seems to prevent this.
| Resource | Recommended Usage in Phase 3 |
|---|---|
| Wind Tamer Vessel | Stun boss & dispel sandstorm for a safe damage window. |
| Mana | Cast Pluck of Many for massive burst damage. |
| Transformation | Use for survivability (Azure Dust) or mobility (Red Tides). |
| Heavy Attacks | Use after staggering the boss or following spell casts. |
Victory over the Yellow Wind Sage in 2026 rewards the player with the second Relic, Fuming Ears, crafting materials for a new weapon, and passage into the mysteries of Chapter 3. This battle remains a masterclass in aggressive, adaptive combat, demanding respect for its escalating mechanics and rewarding thorough preparation with a hard-earned triumph.